Introduction to LDAP
Purpose
The Lightweight Directory Access Protocol (LDAP) is a directory service protocol that runs on a layer above the TCP/IP stack. It provides a mechanism used to connect to, search, and modify Internet directories.
How directory service works?
The LDAP directory service is based on a client-server model.
LDAP stores data in tree structure. When LDAP client connects to an LDAP server and requests information or performs an operation, the server performs the operation or provides the information.
Directory Entries
An LDAP directory is a collection of entries, which consist of one or more attributes each. Each attribute has one or more values.
The entries are arranged hierarchically in a tree that is structured geographically and organizationally. Global entries, such as countries/regions, reside at the top of the tree, followed by state or national organizations, then organizational units, people, devices, or anything else that might be represented in a directory.
A directory entry is represented by its entry name, or relative distinguished name (RDN), and by its distinguished name (DN).
A distinguished name (usually just shortened to “DN”) uniquely identifies an entry and describes its position in the DIT(Directory Information Tree).
DNs are comprised of zero or more comma-separated components called relative distinguished names, or RDNs.
For example, the DN “uid=ldapuser3,ou=backend, dc=postgreshelp, dc=com”
Here, the above DN has 4 RDNs.
| Attribute | description |
| CN | commonName : Identifies the person or an object |
| SN | surname |
| SERIALNUMBER | serialNumber |
| C | countryName : country |
| L | localityName : city or an area |
| ST or S | stateOrProvinceName : A state or province |
| STREET | streetAddress |
| O | organizationName : Name of the organization |
| OU | organizationalUnit : A unit or department within the organization. |
| T or TITLE | title |
| G or GN | givenName |
| E | emailAddress (deprecated) |
| UID | userID |
| DC | domainComponent |
PostgreSQL and LDAP
PostgreSQL uses LDAP as one of the authentication methods to connect to the cluster.
Since LDAP is used only to validate the user name/password pairs. Therefore the user must already exist in the database before LDAP can be used for authentication.
Table of Contents
LDAP bind operation:
LDAP authentication can operate in two modes. In the first mode, which we will call the simple bind mode, and the second as search+bind mode.
Bind—Use LDAP bind when PostgreSQL connects to the LDAP server and binds using the CN and password.
Search+bind authentication executes ldapsearch against one or more directory services and binds with the distinguished name (DN) and password.
Here is an example for a simple-bind LDAP configuration:
host ... ldap ldapserver=ldap.example.net ldapprefix="cn=" ldapsuffix=", dc=example, dc=net"
Here is an example for a search+bind configuration:
host ... ldap ldapserver=ldap.example.net ldapbasedn="dc=example, dc=net"
ldapsearchattribute=uid
How to configure LDAP Server and authenticate PostgreSQL user with LDAP?
The case study is divided into four sections
- Configure LDAP server
- Configure PostgreSQL cluster
- Configure LDAP client
- Authenticate the PostgreSQL user using LDAP authentication.
In this demo,
- 192.168.1.131(pgserver) is used as LDAP server
- 192.168.1.130(pgclient) is used as LDAP client and PostgreSQL database server
Install PostgreSQL binaries with (ldapclient)
./configure –with-ldap –with-openssl
make
make install
Step 1: Installing LDAP packages using yum
yum -y install openldap* migrationtools
Step 2: generating LDAP admin password
slappasswd
Step 3: Add generated password and modify the files as mentioned below
Modify *bdb.ldif and *monitor.ldif files under /etc/openldap/slapd.d/cn=config
directory
modify *bdb.ldif as below
olcSuffix: dc=postgreshelp,dc=com #modify
olcRootDN: cn=Manager,dc=postgreshelp,dc=com #modify
olcRootPW: #new entry
olcTLSCertificateFile: /etc/pki/tls/certs/postgreshelpldap.pem #new entry
olcTLSCertificateKeyFile: /etc/pki/tls/certs/postgreshelpkey.pem #new entry
modify *monitor.ldif as below
olcAccess: {0}to * by dn.base=”gidNumber=0+uidNumber=0,cn=peercred,cn=exter
nal,cn=auth” read by dn.base=”cn=manager,dc=postgreshelp,dc=com” read by * n
one
Test your LDAP configuration using below command, you may see few checksum errors no problem don’t bother
slaptest -u
Step 4: Start LDAP server slapd
chkconfig slapd on
service slapd start
Step 5: Generate self signed certificates
openssl req -new -x509 -nodes -out /etc/pki/tls/certs/postgreshelpldap.pem -keyout /etc/pki/tls/certs/postgreshelpkey.pem -days 365
Optionally you may give below details while generating certificate
Country Name (2 letter code) [XX]:IN
State or Province Name (full name) []:Telangana
Locality Name (eg, city) [Default City]:Hyderabad
Organization Name (eg, company) [Default Company Ltd]:IT
Organizational Unit Name (eg, section) []:IT
Common Name (eg, your name or your server’s hostname) []:ldapserver
Confirm the certificate generated in /etc/pki/tls/certs directory.
Step 6: Change migration config
Go to directory path as mentioned below and edit the file migrate_common.ph file add few entries as shown in below screen
cd /usr/share/migrationtools/
Modify migrate_common.sh file
[root@ldapserver migrationtools]# cat migrate_common.ph
$DEFAULT_MAIL_DOMAIN = "postgreshelp.com";
$DEFAULT_BASE = "dc=postgreshelp.com";
$EXTENDED_SCHEMA = 1;
Step 7: Creating openLDAP database file
touch /root/base.ldif
[root@ldapserver migrationtools]# cat /root/base.ldif
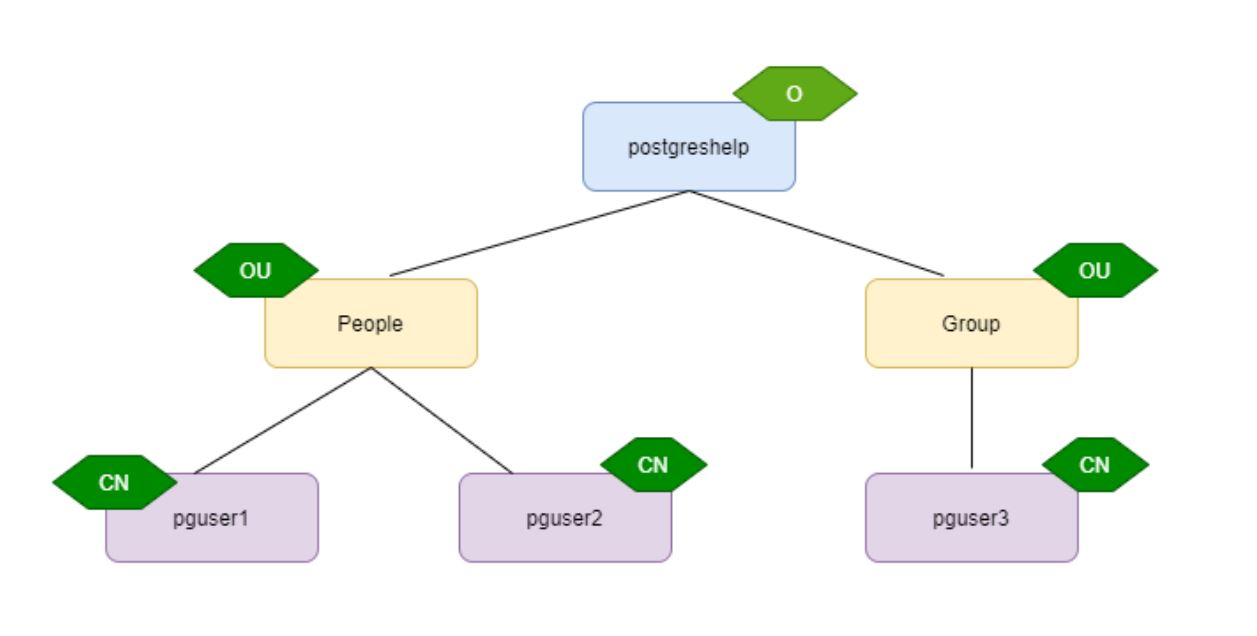
dn: dc=postgreshelp,dc=com
objectClass: top
objectClass: dcObject
objectclass: organization
o: postgreshelp com
dc: postgreshelp
dn: cn=Manager,dc=postgreshelp,dc=com
objectClass: organizationalRole
cn: Manager
description: Directory Manager
dn: ou=People,dc=postgreshelp,dc=com
objectClass: organizationalUnit
ou: People
dn: ou=Group,dc=postgreshelp,dc=com
objectClass: organizationalUnit
ou: Group
Step 6: Creating users and groups
useradd pguser1
useradd pguser2
passwd pguser1
passwd pguser2
now gather all the users and groups information to separate files
cat /etc/passwd |grep pguser > /root/password
cat /etc/group |grep pguser > /root/groups
after that migrate your local users as openLDAP users
cd /usr/share/migrationtools/
./migrate_passwd.pl /root/password /root/users.ldif
./migrate_group.pl /root/groups /root/groups.ldif
ldapadd -x -W -D "cn=Manager,dc=postgreshelp,dc=com" -f /root/base.ldif
ldapadd -x -W -D "cn=Manager,dc=postgreshelp,dc=com" -f /root/users.ldif
ldapadd -x -W -D "cn=Manager,dc=postgreshelp,dc=com" -f /root/groups.ldif
Verify the users using below command
ldapsearch -x cn=pguser1 -b dc=postgreshelp,dc=com
Step 8: Install NFS util packages
yum -y install rpcbind nfs-utils
chkconfig rpcbind on
chkconfig nfs on
service rpcbind start
service nfs start
configure NFS export
vi /etc/exports
/home *(rw,sync)

service nfs start
service rpcbind start
service nfs restart
showmount -e localhost
service slapd start
Client configuration
yum install -y openldap-clients nss-pam-ldapd sssd authconfig-gtk
yum install nfs-utils rpcbind autofs
Using CLI mode
type command “authconfig-tui“
Select [*] Use LDAP
select [*] Use LDAP Authentication
click Next
provide the ldap server details as shown above and click ok
verify the ldap user information using below command
getent passwd pg_user1
Configure PostgreSQL for LDAP
Create a database pg_ldap with a user pg_user1
add below entry in pg_hba.conf
host all all 0.0.0.0/0 ldap ldapserver=192.168.1.131 ldapbasedn=”dc=postgreshelp, dc=com” ldapsearchattribute=uid
enable alert logging and test the connectivity happening thru ldap.
Add a new user in PostgreSQL server and authenticate from LDAP
- Add a user in PostgreSQL server (client)
- useradd pguser3
passwd pguser3 - get the existing user details and create a ldif file accordingly
ldapsearch -x cn=pguser1 -b dc=postgreshelp,dc=com
3. cat pguser3.ldif
ldapadd -x -W -D “cn=Manager,dc=postgreshelp,dc=com” -f pguser3.ldif
ldappasswd -s rac123 -W -D “cn=Manager,dc=postgreshelp,dc=com” -x “uid=pguser1,ou=People,dc=postgreshelp,dc=com”